Thursday, June 18, 2009

Using a Neutral Density filter

source: http://www.ephotozine.com/article/Using-a-Neutral-Density-filter-4871

Using a Neutral Density filter - Attaching a neutral density filter to your camera lens will bring you several benefits says Peter Bargh of ePHOTOzine.
Words & Pictures Peter Bargh

One filter that is in the camera outfit of many professionals is the neutral density filter, or ND filter as it's better known. The filter is less appreciated by amateurs and the reason it probably has little appeal is its looks - a plain, dull grey filter. Not colourful, no star effect, no gradation, no multiple image glass...just plain grey. And what does it do? Reduce the exposure? Hmmm I can do that with my camera...it's pointless! Well actually it isn't, and that's why the ND filter is a necessity for the professional and often found in the enthusiast landscape photographer's camera bag.

The ND filter may be plain grey, but it's a neutral grey so whatever light it lets through isn't affected in colour, just in brightness. So why would you want a filter that reduces the exposure when it can be done using your camera's shutter speeds or apertures? This depends on a few things. Firstly you may have a fully automatic camera. If so, the ND filter will give you a small amount of manual versatility. Or you may have been taking pictures in low light using fast film and then ventured out into bright sunlight where it was physically impossible to take a photo because your camera's fastest shutter speed was flashing, even though the aperture was adjusted to the smallest setting.

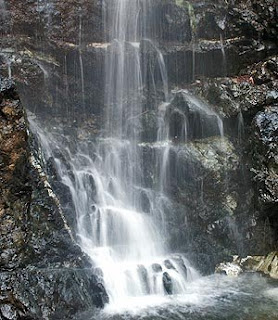
The ND filter will reduce the light and allow the shot to be taken. Using an ND filter in this way is not its primary benefit though. Have you seen those shots of waterfalls that look ethereal with blurry cotton wool water? Well the chances are an ND filter will have been used. Here the filter is used to reduce the shutter speed so that blur occurs. If you are out in a bright location the shutter speed will be at least 1/125sec and ideally you need 1/15sec or slower. So pop on the necessary ND filter and you'll gain the effect you're after.


Architecture photographers have a useful technique that often needs an ND filter to work. When photographing famous landmarks you often have problems with tourists getting in the way. If the shutter speed is slow enough it will be open long enough to ensure the moving people are so blurred they cannot be seen on the image. A 1/2sec exposure may record a streak of someone walking while a 4 sec exposure will make them vanish. Simple, but very effective.


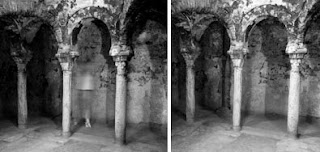
A tourist was looking around this historic ruins. Left: A half second exposure has picked up the person's body as a blur. Right: two seconds and the figure has gone!


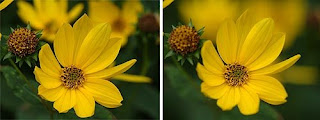
It's not just the shutter speed that you may want to improve. If you are shooting in bright conditions you may find the aperture the camera is selecting is small and the resulting picture will have far too much front-to-back subject sharpness known as depth-of-field. This is often the case with portraiture or flower photography where a distracting background ruins the photo. Using an ND filter will help you open up the lens and provide shallow depth-of-field.


Another use for an ND filter would be when using flash. You can often reduce the exposure of the flash using auto settings, but for close ups that may not be possible. The ND filter will provide the key to this essential barrier.

There are several types of ND available - screw in ones come in various filter thread sizes and slot in ones fit into a holder that screws onto the lens. They are available in different strengths too, known as the filter exposure factor as follows:

ND filters and their exposure factors
2x one stop
4x two stops
8x three stops
64x six stops

Using an ND filter is simple, you just either screw on or slot into a holder and leave the camera's automatic exposure system to work out the filter factor. If it's an 8x, for example, the camera will reduce the shutter speed from, say, 1/125sec to 1/15sec to compensate for the three stops extra light required. Or the aperture will be opened up from f/22 to f/8.

Tip: use a polarising filter
A polarising filter offers a similar light reducing option as a Neutral Density 4x filter. Add two polarisers together and you can get an infinitely variable ND from 4x to very strong (almost black) by rotating the front one.


DIY Lightbox for product photography

source: http://jyoseph.com/diy-light-box-for-product-photography/

Building a light box is pretty easy stuff. A light box is particularly useful for product photography where you need a nice white background. Many people find that their products will actually sell faster with a more professional looking photo. Here you'll find a step by step on how to build your own DIY light box.

Materials Needed


Foam Board
You'll need 5 sheets of foam board, also called foam core or foam poster board. If you go to the local craft / art store you should be able to pick up large sheets for just a few dollars a piece. I have a huge box in my basement and the pieces were $4.99 a piece. The board used in this tutorial was $1.99 a piece (each piece is 30" x 20"). * My recommendation is to get a thicker piece for the bottom where the object will sit.

White Tape
The tape I'm using is between 1" and 2" wide white masking tape. Stay away from duct tape, as the heat from the lamps makes the glue really messy. This masking tape is nice and lightweight and if you need to, you can take the tape off to re-adjust.

Lamp / Light Bulbs
I'm using clip-on shop lights from Home Depot / Lowe's. You can pick these up for just a few dollars a piece.($3-$9) I'm using just a standard bulb from Home Depot. I've tried all sorts of bulbs. To your eye they may all look the same, the camera picks up different colors from different lights.

Edit
I tried full spectum bulbs and really have to say that they're not worth it. Learn to set the white balance on your camera and shoot in RAW if possible. *Above all, I favor and would suggest using a flash directed straight up into the top of the box, this is THE BEST WAY TO GET A GOOD WHITE BACKGROUND - (see the diagram below).

Other
You'll need a razor knife and a straight edge.

Instructions:

1. Attach the Top and Bottom
Here is a quick sample of how I apply the tape. I know it's overkill to show this but I'd rather err on the side of being thorough.


2. Attach the Left and Right
It may be hard to see how it will come together, but I just applied the left side (which is at the top of the photo below). Do the same for the right side.

3. Cut Off Overhang on the Sides
Left: Shows the box with the overhang on left and right side. Middle: Shows using a straight edge to cut the excess. Right: Shows the box with the sides trimmed down.


4. Cut Notches in Sides
This is something I just recently started doing. I found that I wasn't able to set the lights deep enough so cutting a notch in the side helps. You may have to skip this step and see the final deal, then you'll get the idea. The notches I cut were only a few inches deep, you could do more or less. Make it work for you. *If you're using a flash this step is unnecessary.


5. Lights
You can see I added a few more lights. The more the better in my opinion. *Use a flash if possible.


Showing the outside of the box.


Use this light box with a Flash. Here would be a sample illustration of how to use the flash with this setup. This works like a charm.


Optional Step
You can apply a strip of tape to the back seam on the bottom. Apply it so the tape forms an even transition between the two pieces of foam core. This hides the back seam so you don't have any shadows in the background. Here is a quick and dirty illustration to show what I mean:

See What it Produces
After literally 2 minutes with the light box and a few snaps later here is a shot I took of one of my lenses. Obvious improvements could be made here but this is just a quick image to show you how simple using this box can be.


But Wait, There's More
Here is another trick I started doing. Sometimes I like to shoot the object from a top view. If you cut a hole in the top of the box, this is possible. Be careful not to cut too much, you'll want to score the part you don't cut, that makes it bend with ease.


Wednesday, June 17, 2009

DIY Dry Box

What is a Dry Box?

A dry box is a container that is used to keep material dry.

One kind of dry box is used by divers and, typically, is good to 30 meters of depth[1].

Such dry boxes contain assorted gear dry such as photographic equipment and supplies.

Dry boxes are also used in the storage of surface mount electronic components prior to circuit board assembly.

Some musicians use dry box to store their instrument (eg. violin).

source: http://en.wikipedia.org/wiki/Dry_box

DIY DRY BOX

You will need the following:

1. Air-tight container(6 liter/1.6 gallon capacity depending on your needs). This can be bought at your local home store or DIY store. Cost approximately US$10.00

2. Hygrometer. This device measures humidity. This can be bought at car accessory stores, DIY shop or pharmacy. Cost approximately US$4.00

3. Dehumidifier (calcium chloride) or silica gel. These items absorb moisture in the air. These can be bought at the DIY shop or pharmacy. Cost approximately US$1.50

4. As an alternative, there are air-tight containers with hygrometers embedded in them. This can be bought at the camera stores or DIY shops. They cost around US$24.00.

*** the dehumidifiers because they absorb moisture faster compared to silica gels. Downside is that they convert to liquid form once they absorb the moisture. This means that they have to be replaced approximately every 3-4 months. That’s fine with me cause they don’t cost that much. Try keep humidity between 30% to 40%. You can lower it by adding more dehumidifier/silica gel but this not advisable.

Silica gels are rechargeable and you can remove the moisture from them by heating it.


source: http://junsphoto.wordpress.com/2009/04/27/do-it-yourself-dry-box/

Monday, June 8, 2009

What are Silica Gels for?


If you’re going to the beach or expect it to rain, carry along some plastic ziplock bags to place your digital camera in it for protection from the elements.

Damage to a the lens and other digital camera parts can be caused by prolonged moisture and humidity. This is a concern not only when actively using a camera, but when it is stored and won’t be used again for a long time.

In spite of your best efforts, if condensation forms on your digital camera, remove the batteries and memory card. Wait about an hour or until moisture is no longer present. If this is not enough to eliminate the moisture, store your camera with silica gel.

Silica gel

Silica gel acts as a shield of dry air in an enclosed storage area such as a camera bag. It is a blue colored “desiccant” that adsorbs moisture and condensation. The color changes to white or pink when the gel has absorbed the maximum amount of moisture.

Regenerating silica gel

When silica gel has absorbed the maximum amount of moisture, it can be reused after drying it out. The gel is “regenerated” by placing it in the sun or heating in a microwave or conventional oven.

Keep a few bags of silica gel in your camera bag and each time you store it. The more equipment you have, the more bags or canisters you should pack when storing it.
Silica gel can be purchased in packets, canisters and cartons.
article post from this site

Friday, June 5, 2009

11 Tips for Beginner Photographers

1. Don’t go crazy buying the most expensive equipment right away.

It’s possible to get very nice photos with an inexpensive point and shoot. See these examples on Flickr. The more photos you take, the more you’ll know about what kind of camera to get when it’s time to upgrade.

2. Consider a tripod.

On the other hand, an inexpensive tripod is worth getting, especially if you have shaky hands like mine. When I got a tripod, my satisfaction with my shots skyrocketed. For even more stability, use your camera’s timer function with a tripod (read our introduction to tripods).

3. Keep your camera with you all the time.

Photo ops often come when you least expect it. If you can keep your equipment relatively simple - just a small camera bag and a tripod - you might be able to take advantage of some of those unexpected opportunities. Or, if your phone has a camera, use it to take “notes” on scenes you’d like to return to with your regular camera.

4. Make a list of shots you’d like to get.

For those times you can’t carry your camera around, keep a small notebook to jot down places you’d like to come back and photograph. Make sure to note any important details, like the lighting, so you can come back at the same time of day or when the weather’s right. If you don’t want to carry a notebook, send yourself an email using your cell phone with Jott.com.

5. Don’t overlook mundane subjects for photography.

You might not see anything interesting to photograph in your living room or your backyard, but try looking at familiar surroundings with fresh eyes. You might catch an interesting trick of the light or find some unexpected wildflowers in your yard. Often a simple subject makes the best shot.


6. Enjoy the learning process.

The best part of having a hobby like photography is never running out of things to learn. Inspiration is all around you. Look at everything with the eyes of a photographer and you’ll see opportunities you never noticed before.

7. Take advantage of free resources to learn.

Browse through Flickr or websites like the Digital Photography School Forum for inspiration and tips. Also, your local library probably has a wealth of books on all types of photography. If you’re interested in learning about post-processing, give free software like the GIMP a try.

8. Experiment with your camera’s settings.

Your point and shoot may be more flexible and powerful than you know. Read the manual for help deciphering all those little symbols. As you explore, try shooting your subjects with multiple settings to learn what effects you like. When you’re looking at your photos on a computer, you can check the EXIF data (usually in the file’s properties) to recall the settings you used.

9. Learn the basic rules.

The amount of information about photography online can be overwhelming. Start with a few articles on composition. Be open to what more experienced photographers have to say about technique. You have to know the rules before you can break them.

10. Take photos regularly.

Try to photograph something every day. If you can’t do that, make sure you take time to practice regularly, so you don’t forget what you’ve learned. An excellent way to motivate yourself is by doing the weekly assignments in the DPS Forum.

11. Don’t be afraid to experiment.

If you’re using a digital camera, the cost of errors is free. Go crazy - you might end up with something you like. You’ll certainly learn a lot in the process.


Understanding Aperture

I found this one article about understanding aperture. Here it explains very clearly what aperture is and what it can do when taking photos.

Here is the link to the article

What is Aperture?

Put most simply - Aperture is ‘the size of the opening in the lens when a picture is taken.’

When you hit the shutter release button of your camera a hole opens up that allows your cameras image sensor to catch a glimpse of the scene you’re wanting to capture. The aperture that you set impacts the size of that hole. The larger the hole the more light that gets in - the smaller the hole the less light.

Aperture is measured in ‘f-stops’. You’ll often see them referred to here at Digital Photography School as f/number - for example f/2.8, f/4

, f/5.6,f/8,f/22 etc. Moving from one f-stop to the next doubles or halves the size of the amount of op

ening in your lens (and the amount of light getting through). Keep in mind that a change in shutter speed from one stop to the next doubles or halves the amount of light that gets in also - this means if you increase one and decrease the other you let the same amount of light in - very handy to keep

in mind).

One thing that causes a lot of new photographers confusion is that large apertures (where lots of light gets through) are given f/stop smaller n

umbers and smaller apertures (where less light gets through) have larger f-stop numbers. So f/2.8 is in fact a much larger aperture than f/22. It seems the wrong way around when you first hear it but you’ll get the hang of it.

Depth of Field

and Aperture


There are a number of results of changing the aperture of your shots that you’ll want to keep in mind as you consider your setting but the most noticeable one will be the depth of field that your shot will have.

Depth of Field (DOF) is that amount of your shot that will be in focus. Large depth of field means that most of your image will be in focus whether it’s close to your camera or far away (like the picture to the

left where both the foregrou

nd and background are largely in focus - taken with an aperture of f/22).

Small (or shallow) depth of field means that only part of the image will be in focus and the rest will be fuzzy (like in the flower at the top of this post (click to enlarge). You’ll see in it that the tip of the yellow stems are in focus but even though they are only 1cm or so behind them that the petals are out of focus. This is a very shallow depth of field and was taken with an aperture of

f/4.5).

Aperture has a big impact upon depth of field. Large aperture (remember it’s a smaller number) will decrease depth of field while small aperture (larger numbers) will give you larger depth of fi

eld.

It can be a little confusing at first but the way I remember it is that small numbers mean small DOF and large n

umbers mean large DOF.

Let me illustrate this with two pictures I took earlier this week in my garden of two flowers.

The first picture below (click them to enlarge) on the left was taken with an aperture of f/22 and the second one was taken with an aperture of f/2.8. The difference is quite obvious. The f/22 picture has both the flower and the bud in focus and you’re able to make out the shape of the fence and leaves in

th

e background.

The f/2.8 shot (2nd one) has the left flower in focus (or parts of it) but the depth of field is very shallow and the background is thrown out of focus and the bud to the right of the flower is also less in focus due to it being slightly further away from the camera when the shot was taken.


f-22

f/2.8

The best way to get your head around aperture is to get your camera out and do some experimenting. Go outside and find a spot where you’ve got items close to you as well as far away and take a series of shots with different aperture settings from the smallest setting to the largest. You’ll quickly see the impact that it can have and the usefulness of being able to control aperture.

Some styles of photography require large depths of field (and small Apertures)

For example in most landscape photography you’ll see small aperture settings (large numbers) selected by photographers. This ensures that from the foreground to the horizon is relatively in focus.

On the other hand in portrait photography it can be very handy to have your subject perfectly in focus but to have a nice blurry background in order to ensure that your subject is the main focal point and that other elements in the shot are not distracting. In this case you’d choose a large aperture (small number) to ensure a shallow depth of field.

Macro photographers tend to be big users of large apertures to ensure that the element of their subject that they are focusing in on totally captures the attention of the viewer of their images while the rest of the image is completely thrown out of focus


Read more: http://digital-photography-school.com/aperture#ixzz0HY2PPnRS&C


Thursday, June 4, 2009

O'Sonho Restaurant

Craving for some Portuguese dish? This is a place for you in the city.
O'Sonho is located at #20 Jupiter Street, Makati City (EDSA side).
They are open Monday-Thursday at 10am to 11pm; Friday & Saturday 10am to 2am and Sunday at 10am to 11pm.
For reservations you can call (02) 896-3289

Here are some of their dishes that I've tried and they're all tasty!!


Salmon


Coffee marinated Roast Pork

Spaghetti Bacalhau

Peri-Peri Chicken on Rice

O' Sonho's Platter of Fries

Avocado Cream Salad

Caldo Verde (soup)

Portuguese Gambas